Tag Archive for: How To

how-to-use-altera-14k
The Altera 14K is a high-performance Direct-to-Lung (DTL) disposable vape designed for cloud chasers and flavor enthusiasts alike. With up to 14,000 puffs, dual power modes, and customizable airflow, it delivers a seamless DTL experience—all in a ready-to-use disposable design. Follow the official 3-step process below to start vaping instantly.


Step 1: Remove the device from the candy bag, pull off the silicone plug.

how-to-use-altera-14k-1
Begin with the simple unboxing prep:
  1. Take the Altera 14K out of its protective candy bag packaging.
  2. Locate the silicone plug on the top of the device and pull it off completely.
This removes the shipping protection, making the device ready for activation.


Step 2: Slide to open the bottom airflow control switch, press the bottom round function key three times to turn on or off.

Unlock the device and customize airflow for your DTL style:
  1. Find the airflow control switch on the device’s bottom and slide it open (adjust to your preferred airflow intensity for bigger clouds or concentrated flavor).
  2. Locate the round function key on the bottom, then press it three times to power the device on or off.
This step is critical for activating the device and setting up the airflow for smooth lung hits.


Step 3: Press the bottom function key once to switch ECO/BOOST modes as preferred, then vape.

how-to-use-altera-14k-3
Tailor your performance and start vaping:
  1. Press the bottom function key a single time to toggle between ECO Mode (for extended battery life and smooth draws) and BOOST Mode (for maximum power and dense DTL clouds). The device’s display clearly indicates the active mode.
  2. Take a direct-to-lung draw from the mouthpiece to enjoy your vape.


Key Altera 14K Highlights

  • DTL Design: Optimized for direct-to-lung inhales, delivering thick, satisfying clouds.
  • 14,000 Puffs: Long-lasting performance backed by a 17ml pre-filled tank and 1200mAh rechargeable battery (Type-C port included).
  • Dual Modes: ECO for casual use, BOOST for cloud-chasing sessions.
For full specs and flavor options, visit the official Fumot Altera 14K product page.

Please refer to the blog post for details on the differences between DTL Vape and MTL Vape.


About Fumot Tech

Shenzhen Fumot Technology Co., Ltd specializes in the production, research, and sales of disposable vape devices and customized electronic cigarette hardware. Over the past decade, Fumot has introduced several vape brands, including FumotSupbliss, and Vome, earning the admiration of a vast consumer base.

We pride ourselves on pioneering hardware designs and infusing the most delectable flavors into our devices. With our formidable research and development, manufacturing, and marketing capabilities, our products have reached major markets, including North America, Southeast Asia, the UK, Europe, and Russia. Our mission is to provide customers with the finest disposable vape devices!

Be sure to share your vaping story and tag us on social media with the tags #fumot_official, #fumotvape,  #supblissvape, or #vomevape.

Follow us on FacebookInstagramYouTube, and X.

how-to-use-matelix-pro
The Matelix Pro is a premium, highly customizable refillable vape system featuring dual power modes, adjustable airflow, and a smart display. Below is the step-by-step tutorial, ensuring error-free setup and use.

What You’ll Need First

  • 1 x Fumot Matelix Pro (unboxed from its protective pouch)
  • One 10ml bottle of e-liquid (compatible with refillable pod systems)

Step 1: Remove the device from the pouch.

how-to-use-matelix-pro-1
Initiate your Matelix Pro setup with the foundational unboxing step:
  1. Locate the sealed, protective pouch that encases the full Matelix Pro device (main body + attached cartridge).
  2. Open the pouch and remove the entire device assembly to begin the preparation process.
This step ensures the device remains free from dust, debris, and moisture before any handling or assembly.

Step 2: Separate the cartridge from the device, remove the insulating sticker and silicone plug from the cartridge.

how-to-use-matelix-pro-2-1
This step focuses on prepping the cartridge, with clear distinction between the two protective components—note their different locations as specified in the official guide:
  1. Grip the Matelix Pro’s main body firmly, then pull the cartridge (the top pod component) straight upward to separate it completely from the device.
  2. Locate the insulating sticker (a thin, protective label) on the base of the cartridge (the area that connects to the main device) and peel it off—this deactivates the shipping safety lock for the coil.
  3. Locate the silicone plug (a soft, protective cap) that covers the cartridge’s mouthpiece (drip tip) (the top opening for vaping) and remove it.
Critical Clarification: The silicone plug removed here is exclusively for the mouthpiece, and the insulating sticker is on the cartridge base. The e-liquid filling hole is not accessed or uncovered in this step.

Step 3: Open the silicone plug, fill the tank with one 10ml bottles of e-liquid, wait 2 minutes, and then start vaping.

how-to-use-matelix-pro-3
  1. On the side of the cartridge (not the top mouthpiece), locate the small, dedicated silicone plug that covers the e-liquid filling hole. Open the side silicone plug to fully expose the filling port.
  2. Position the nozzle of your 10ml e-liquid bottle directly over the side filling hole, then carefully inject the e-liquid into the cartridge’s tank. Do not overfill—stop once the e-liquid reaches the tank’s maximum fill line to prevent leaks.
  3. Close the side silicone plug firmly over the filling hole to create an airtight seal.
  4. Reattach the fully prepared cartridge to the Matelix Pro’s main device body, pressing down until it clicks securely into place.
Non-Negotiable Tip: Wait 2 full minutes before starting to vape. This critical waiting period allows the e-liquid to fully soak into the cartridge’s coil (coil priming), eliminating the risk of dry hits and extending the coil’s service life.

Vaping Mode: BOOST–ECO

The Matelix Pro is engineered with two distinct power modes to suit different vaping preferences, as outlined in the official guide:
  • BOOST Mode (26–40W): Delivers high power output for dense, voluminous clouds and amplified flavor intensity—ideal for cloud chasers.
  • ECO Mode (15–25W): Optimizes power usage for extended battery life and smoother, milder draws—perfect for casual daily use.
A key convenience feature: the device automatically remembers the power level you last used in each mode, so you can switch between BOOST and ECO without re-adjusting settings.

Theme

how-to-use-matelix-pro-5
Customize your Matelix Pro’s display with three unique, pre-loaded themes (each with distinct background graphics), as specified in the official manual:
  1. Normal: A clean, minimalist interface that prioritizes readability of core metrics (power, mode, battery).
  2. Summer Colorful: A vibrant, dynamic theme with bold color schemes and lively background animations.
  3. Robot: A playful, space-inspired theme featuring futuristic robot and cosmic graphics.
Each theme cycles through unique background visuals, letting you personalize the device’s appearance to match your style.

Button Operation Instructions

how-to-use-matelix-pro-6
All core functions of the Matelix Pro are controlled via the single side button—follow these exact official operation steps for seamless use:
  1. 1 click: Wake up the device’s display (activates the screen from sleep mode).
  2. 2 clicks: Switch between BOOST and ECO vaping modes; the device retains your last power setting for each mode.
  3. 3 clicks within 2 seconds: Enter power adjustment mode. Each subsequent click increases power by 1W (for rapid fine-tuning); power levels cycle once the maximum is reached.
  4. 4 clicks within 3 seconds: Cycle through the three display themes (Normal → Summer Colorful → Robot).
  5. 5 clicks within 3 seconds: Power the device on or off (the primary power control function).
  6. 10 clicks within 5 seconds: Clear the device’s puff count and reset the initialization display—ideal for tracking fresh usage cycles.

Adjustment of Airflow

how-to-use-matelix-pro-7
Fine-tune your vaping experience with the Matelix Pro’s intuitive airflow adjustment (located on the device’s side):
  1. Locate the airflow adjustment slider on the side of the Matelix Pro’s main body.
  2. Slide the control to your desired position:
    • Tighter airflow: Concentrates flavor and delivers a more pronounced throat hit.
    • Wider airflow: Produces cooler vapor, smoother draws, and larger cloud production.
This customizable airflow pairs perfectly with the BOOST/ECO modes to create a tailored experience for every vaper.

Key Details From the Matelix Pro Product Page

To maximize the performance and lifespan of your Matelix Pro, reference these official product specifications:
  • Coil System: Optimized for 0.6Ω mesh coils, which deliver consistent atomization across both BOOST and ECO modes.
  • Smart Display: A 0.96-inch high-resolution screen shows real-time data including power level, mode, battery percentage, coil resistance, and puff count.
  • Build Quality: A sleek, durable design that balances portability with robust construction, perfect for daily use and on-the-go vaping.
For full specifications, flavor compatibility, and replacement coil details, visit the official Fumot Matelix Pro product page.

The Fumot Matelix Pro’s precision design is engineered for both performance and convenience. By following these official steps, you’ll ensure leak-free refills, optimal coil performance, and full access to the device’s customizable features.

Whether you’re powering through cloud sessions in BOOST mode or enjoying a relaxed vape in ECO mode, the Matelix Pro delivers a polished, personalized experience—when used exactly as outlined in the official guide.


About Fumot Tech

Shenzhen Fumot Technology Co., Ltd specializes in the production, research, and sales of disposable vape devices and customized electronic cigarette hardware. Over the past decade, Fumot has introduced several vape brands, including FumotSupbliss, and Vome, earning the admiration of a vast consumer base.

We pride ourselves on pioneering hardware designs and infusing the most delectable flavors into our devices. With our formidable research and development, manufacturing, and marketing capabilities, our products have reached major markets, including North America, Southeast Asia, the UK, Europe, and Russia. Our mission is to provide customers with the finest disposable vape devices!

Be sure to share your vaping story and tag us on social media with the tags #fumot_official, #fumotvape,  #supblissvape, or #vomevape.

Follow us on FacebookInstagramYouTube, and X.

how-to-use-eco-2in1-refillable
The Eco 2in1 Refillable stands out as a revolutionary dual-flavor, refillable vape system, engineered for personalized vaping and long-lasting performance. Its core appeal lies in the ability to enjoy two distinct 10ml e-liquid flavors in one device, paired with intuitive operation. Below is the step-by-step tutorial with enhanced focus on the filling hole’s precise location—a critical detail for error-free use.

What You’ll Need First

  • 1 x Fumot Eco 2in1 Refillable (unboxed from its protective pouch)
  • 10ml e-liquid bottles (mandatory: flavors must match the labels printed on the device)

Step 1: Remove the device from the pouch.

how-to-use-eco-2in1-refillable-1
Begin with the foundational unboxing step:
  1. Locate the sealed, protective pouch that houses the Eco 2in1 Refillable.
  2. Open the pouch and remove the device in its entirety.
This step ensures your device is free from dust and moisture before you begin the critical setup and refilling process.

Step 2: Lift the drip tip upward and rotate it 90° to see the black silicone plug. Open the black silicone plug to display the filling hole.

This step is where you’ll access the precise location of the filling hole—pay close attention to avoid misalignment or leaks:
  1. Grip the drip tip (the top mouthpiece of the device) firmly and lift it straight upward to detach it from the device’s main body.
  2. Rotate the lifted drip tip 90 degrees clockwise or counterclockwise; this action exposes a black silicone plug situated directly on the top surface of the device’s tank compartment (the central area where the drip tip attaches).
  3. Peel back or lift the black silicone plug to fully reveal the filling hole, which is positioned directly beneath this silicone plug on the tank’s top surface—this is the only port designed for e-liquid injection.
Critical Note: The filling hole is recessed slightly within the tank compartment, making the black silicone plug its only cover—never attempt to inject e-liquid into any other opening on the device.

Step 3: Before filling, ensure the flavor of the 10ml e-liquid bottle matches the flavor labeled on the device, then inject the liquid accordingly.

how-to-use-eco-2in1-refillable-3
With the filling hole fully exposed (at its location beneath the opened black silicone plug), follow these steps for precise refilling:
  1. First, cross-verify that the flavor of your 10ml e-liquid bottle matches the flavor label printed directly on the device’s tank adjacent to the filling hole. For dual-flavor use, confirm each e-liquid matches its corresponding tank’s label (the device features two separate tanks, each with its own filling hole in the same location—beneath its respective black silicone plug).
  2. Position the nozzle of your e-liquid bottle directly over the exposed filling hole (the port revealed in Step 2, beneath the black silicone plug).
  3. Slowly and carefully inject the e-liquid into the filling hole, taking care not to overfill the tank—stop when the e-liquid level is just below the rim of the filling hole to prevent leakage.
  4. After filling, press the black silicone plug firmly back over the filling hole to seal it completely.
This strict focus on the filling hole’s location and flavor matching ensures optimal performance and prevents flavor contamination between the device’s dual tanks.

Step 4: Lift the drip tip upward, then twist it to switch flavors.

how-to-use-eco-2in1-refillable-4
Leverage the device’s dual-flavor design—still centered on the same top compartment where the filling holes are located:
  1. Lift the drip tip upward from the device’s main body (the same motion used to access the filling holes in Step 2).
  2. Twist the drip tip to the left or right to align its internal airway with the filling hole/tank of your desired flavor. The device’s transparent tank design lets you clearly see which filling hole/tank the drip tip is aligned with, ensuring you select the correct flavor.
  3. Press the drip tip back down firmly to lock it in place over the chosen filling hole/tank.
This design ties the flavor-switching mechanism directly to the filling hole locations, making it easy to associate each tank with its corresponding flavor.

Step 5: Remove the silicone drip tip and bottom sticker before use. When vaping, the screen displays battery level and brand logo, and the tank is lighted.

how-to-use-eco-2in1-refillable-5
Complete your setup before first use, with a final check of the filling hole area:
  1. Double-check that the black silicone plugs (covering both filling holes) are securely closed, then remove the protective silicone cover from the drip tip itself (a separate protective layer from the filling hole’s silicone plug).
  2. Peel off the insulating sticker from the device’s bottom base—this sticker prevents accidental activation during shipping.
  3. Once prepared, take a gentle draw from the drip tip to activate the device:
    • The digital screen on the device’s front will display the current battery level and Fumot’s brand logo.
    • The tank (including the area surrounding the filling holes) will light up, visually confirming the device is active and the chosen flavor’s tank is in use.

Key Details From the Eco 2in1 Refillable Product Page

To maximize your device’s lifespan and performance, keep these details in mind—all tied to protecting the filling hole and dual-tank system:
  • Dual 10ml Tanks: Each tank features its own filling hole (located beneath a dedicated black silicone plug), totaling 20ml of e-liquid capacity.
  • Type-C Charging: A port on the device’s base lets you recharge the built-in battery, ensuring you use every drop of e-liquid you inject into the filling holes.
  • Leak-Proof Design: The black silicone plugs covering the filling holes are engineered to create an airtight seal, preventing e-liquid from escaping during use or transport.
For full specifications and flavor options, visit the official Fumot Eco 2in1 Refillable product page.

Mastering the precise location of the filling hole (beneath the black silicone plug on the tank’s top surface) is the key to using the Fumot Eco 2in1 Refillable correctly. By following these official steps—with strict attention to where the filling hole is situated and how to access it—you’ll avoid leaks, ensure flavor purity, and unlock the full potential of the device’s dual-flavor functionality.

Whether you’re refilling for the first time or switching between your two favorite flavors, the Eco 2in1 Refillable’s intuitive design (centered on its clearly marked filling holes) makes for a hassle-free vaping experience every time.

About Fumot Tech

Shenzhen Fumot Technology Co., Ltd specializes in the production, research, and sales of disposable vape devices and customized electronic cigarette hardware. Over the past decade, Fumot has introduced several vape brands, including FumotSupbliss, and Vome, earning the admiration of a vast consumer base.

We pride ourselves on pioneering hardware designs and infusing the most delectable flavors into our devices. With our formidable research and development, manufacturing, and marketing capabilities, our products have reached major markets, including North America, Southeast Asia, the UK, Europe, and Russia. Our mission is to provide customers with the finest disposable vape devices!

Be sure to share your vaping story and tag us on social media with the tags #fumot_official, #fumotvape,  #supblissvape, or #vomevape.

Follow us on FacebookInstagramYouTube, and X.

how-to-use-leopard-40k-pod
The Leopard 40K Pod (a refillable and replaceable, high-capacity vape pod with 40,000-puff durability) is designed for flexibility and long-term use. Below is the official step-by-step guide to set up and use your Leopard 40K Pod correctly.


What You’ll Need First

  • 1 x Fumot Leopard 40K Pod (unboxed from its pouch)
  • Your preferred e-liquid (compatible with refillable pod systems)


Step 1: Remove the Device & Extract the Cartridge

how-to-use-leopard-40k-pod-1
Start by prepping the device for filling:
  1. Remove the Leopard 40K Pod from its packaging pouch.
  2. Extract the cartridge (the top component) from the main device body (follow the arrow in the screenshot to separate the two parts).
This step lets you access the cartridge’s tank for e-liquid filling.


Step 2: Fill the Tank (With Critical Waiting Tip)

how-to-use-leopard-40k-pod-2
Follow these steps to fill the cartridge without leaks, then prep the coil:
  1. Open the silicone plug (located on the cartridge) to expose the fill port.
  2. Carefully inject your chosen e-liquid into the tank (do not overfill—stop at the tank’s max line).
  3. Close the silicone plug firmly to seal the tank.
  4. Reattach the cartridge to the main device body.
Critical Tip: Wait two minutes to start vaping after filling the tank. This lets e-liquid soak into the coil (called “priming”), which prevents dry hits and extends the coil’s lifespan.


Step 3: Understand the Vaping Display

how-to-use-leopard-40k-pod-3
When you start using the Leopard 40K Pod:
  • During vaping, the device’s screen will show the current battery level.
  • A green surround color light will activate (visible on the screen’s edge) to confirm the device is in use.
This display keeps you informed of your battery status at a glance—no guessing when to recharge.


Step 4: Use the Child Lock Function

how-to-use-leopard-40k-pod-4
The Leopard 40K Pod includes a child lock for safety:
  1. Locate the bottom switch (on the main device body).
  2. Press the button 5 times within 2.5 seconds to turn the child lock function on or off.
This feature prevents accidental activation by children, aligning with the device’s safety-focused design (per Fumot’s product page).


Key Details From the Leopard 40K Pod

To get the most out of your device:
  • Puff Capacity: Up to 40,000 puffs (one of the longest-lasting refillable pods on the market).
  • Battery: Rechargeable (use the Type-C port on the device to top up power).
  • Flavor Compatibility: Works with all standard e-liquids—pair it with your favorite flavors for consistent, rich vapor.
The Fumot Leopard 40K Pod balances convenience (refillable design) and durability (40,000 puffs). By following these official steps (matching the device’s tutorial screenshot), you’ll ensure great flavor, long coil life, and safe use.
For more details on the Leopard 40K Pod, visit the official product page.


About Fumot Tech

Shenzhen Fumot Technology Co., Ltd specializes in the production, research, and sales of disposable vape devices and customized electronic cigarette hardware. Over the past decade, Fumot has introduced several vape brands, including FumotSupbliss, and Vome, earning the admiration of a vast consumer base.

We pride ourselves on pioneering hardware designs and infusing the most delectable flavors into our devices. With our formidable research and development, manufacturing, and marketing capabilities, our products have reached major markets, including North America, Southeast Asia, the UK, Europe, and Russia. Our mission is to provide customers with the finest disposable vape devices!

Be sure to share your vaping story and tag us on social media with the tags #fumot_official, #fumotvape,  #supblissvape, or #vomevape.

Follow us on FacebookInstagramYouTube, and X.

how-to-use-phantom-x
Welcome to your ultimate guide to the Phantom X vape device—where cutting-edge design meets user-centric functionality. Before diving into the step-by-step setup, let’s highlight what makes the Phantom X stand out from the crowd:

Key Features & Advantages of the Phantom X

  • 10ml Large-Capacity Cartridge: Minimizes frequent refills, so you spend less time topping up and more time enjoying your vape.
  • Magnetic Suction Assembly: Effortlessly attach/detach the cartridge with a secure, tool-free magnetic connection—no fumbling with threads or clips.
  • BOOST & NORM Dual Modes: Tailor your experience: NORM mode for smooth, all-day use; BOOST mode for intensified vapor and bold flavor.
  • Intuitive Digital Display: Track battery life, current mode, and usage at a glance for full control of your session.
  • Child Lock Safety Feature: Prevent accidental activation with a quick 5-tap lock, making it safe for households with kids or on-the-go carry.

Step 1: Unbox & Prep Your Device

how-to-use-phantom-x-1

Take the device out of the package, remove the bottom sticker and the top silicone plug from the cartridge.

Why it matters: The Phantom X’s protective packaging design keeps your device and cartridge clean during transit. Removing these barriers ensures your hardware is primed for optimal performance right out of the box.


Step 2: Refill the Cartridge

Open the silicone plug of the cartridge, fill the 10ml liquid, close the silicone plug and wait for 2 mins then vape it directly.

Breakdown of this step for clarity:

  1. Open the silicone plug on the cartridge to access the filling port.
  2. Fill the cartridge with up to 10ml of your preferred e-liquid (take care not to overfill).
  3. Close the silicone plug tightly, then wait 2 minutes.

    Pro tip: The 10ml large capacity means fewer refills, while the leak-resistant silicone plug keeps your e-liquid secure. Waiting 2 minutes lets the coil fully saturate, preventing dry hits and ensuring consistent flavor—an advantage of the Phantom X’s optimized coil design.


Step 3: Switch Between Vaping Modes

how-to-use-phantom-x-3
Press the side switch of the device to switch between BOOST and NORM modes for distinct vaping experiences.
  • NORM Mode: Perfect for a balanced, everyday vaping session with consistent vapor and flavor—ideal for casual use or longer sessions.
  • BOOST Mode: Unleashes a more powerful output for richer vapor production and intensified flavor profiles, great for cloud chasers or bold flavor enthusiasts.

    Why it’s a win: The dual-mode system lets you adapt to any mood or setting, from relaxed daytime vaping to social sessions where you want to make an impression.


Step 4: Assemble & Start Vaping

how-to-use-phantom-x-4

Combine the cartridge with device by magnetic suction and then use it.

The Phantom X advantage: The magnetic suction design makes assembly effortless—simply align the cartridge with the device body, and the magnetic force will lock them together securely. This tool-free setup means you can swap cartridges or clean your device in seconds, with no risk of cross-threading or damage.


Child Lock: Safety First

how-to-use-phantom-x-5

The Phantom X includes a built-in child lock for peace of mind. To control this feature:

Press the Function Key 5 times within 2.5 seconds to turn the child lock on and off.

Why it matters: This safety feature prevents accidental activation by children or unintended use when your device is in a bag or pocket. It’s a critical advantage for vapers who prioritize safety without sacrificing convenience.


With these straightforward steps and the Phantom X’s premium features, you’re all set to enjoy a tailored, hassle-free vaping experience. For best results, pair it with premium Fumot Nic Salts and keep the device clean to maintain performance over time.

About Fumot Tech

Shenzhen Fumot Technology Co., Ltd specializes in the production, research, and sales of disposable vape devices and customized electronic cigarette hardware. Over the past decade, Fumot has introduced several vape brands, including FumotSupbliss, and Vome, earning the admiration of a vast consumer base.

We pride ourselves on pioneering hardware designs and infusing the most delectable flavors into our devices. With our formidable research and development, manufacturing, and marketing capabilities, our products have reached major markets, including North America, Southeast Asia, the UK, Europe, and Russia. Our mission is to provide customers with the finest disposable vape devices!

Be sure to share your vaping story and tag us on social media with the tags #fumot_official, #fumotvape,  #supblissvape, or #vomevape.

Follow us on FacebookInstagramYouTube, and X.

how-to-use-clear-fill
If you’ve picked up the Fumot Clear Fill (the sleek, water-bottle-inspired refillable pod system), using it correctly ensures great flavor, long coil life, and no messy leaks. Below is the exact step-by-step process from the device’s official manual (matching the tutorial screenshots), so you can get the most out of your Clear Fill.

What You’ll Need First

  • 1 x Fumot Clear Fill device (unboxed from its pouch)
  • Your preferred e-liquid (compatible with refillable pod systems)

Step 1: Fill the Tank With E-Liquid

The Clear Fill uses a bottom-fill design for easy, leak-proof refilling:

Fill-Tank-With-E-Liquid

  1. Remove the Clear Fill from its packaging pouch.
  2. Locate the silicone plug on the bottom of the device (the small, flexible cap on the base).
  3. Twist and pull to open the bottom silicone plug.
  4. Use a dropper or syringe to fill the transparent tank with e-liquid (do not overfill—stop at the tank’s max line to avoid leaks).
  5. Push the bottom silicone plug back into place firmly to seal the tank.
Pro Tip: The Clear Fill’s transparent tank lets you see exactly how much e-liquid is left—no guessing when it’s time to refill!

Step 2: Prep the Coil & Start Vaping

This step is critical to avoid dry hits (burnt flavor) and protect the Clear Fill’s 0.4Ω dual mesh coil:
Prep-Coil-Start-Vaping
  1. Grip the device body, then pull up to remove the drip tip cap (the top mouthpiece).
  2. Leave the cap off for 2 full minutes—this lets e-liquid soak into the coil (called “priming the coil”).
  3. After 2 minutes, take a gentle draw from the drip tip (the Clear Fill is draw-activated—no buttons needed) to start vaping.
Important: Skipping the 2-minute wait will burn the coil, ruining flavor and shortening its lifespan (the Clear Fill’s coil is built for up to 40,000 puffs when primed correctly!).

Step 3: Store the Device (For Long Periods of Non-Use)

To keep your Clear Fill in good shape when you’re not using it:
Store-Device
  1. When you’re done vaping (and plan to set it aside for hours/days), cover the drip tip cap back up (push it down until it fits snugly).
  2. When you want to use it again: Repeat Step 2 (pull up the cap, wait 2 minutes, then vape).
This step prevents e-liquid from evaporating and keeps the coil from drying out between uses.

Quick Tips From The Clear Fill User Manual

  • Avoid overfilling: The Clear Fill’s tank maxes out at 20ml—overfilling causes leaks and clogs the coil.
  • Child safety lock: The Clear Fill includes a built-in child lock (check the device’s base for the lock switch) to prevent accidental use by kids.
  • Charging: When the LED screen shows low battery, use the Type-C port (on the bottom) to recharge the 850mAh battery—full charge takes ~1 hour.
  • Download the Clear Fill User Manual

The Clear Fill is designed to be simple to use, but following these steps (straight from the official tutorial) ensures you get the best flavor, longest coil life, and least mess. With 15 flavor options (from Cool Mint to Strawberry Watermelon) and a 40,000-puff coil, it’s built for daily use—just stick to the steps above!
Have questions about your Clear Fill? Visit official Clear Fill page for more details.

About Fumot Tech

Shenzhen Fumot Technology Co., Ltd specializes in the production, research, and sales of disposable vape devices and customized electronic cigarette hardware. Over the past decade, Fumot has introduced several vape brands, including FumotSupbliss, and Vome, earning the admiration of a vast consumer base.

We pride ourselves on pioneering hardware designs and infusing the most delectable flavors into our devices. With our formidable research and development, manufacturing, and marketing capabilities, our products have reached major markets, including North America, Southeast Asia, the UK, Europe, and Russia. Our mission is to provide customers with the finest disposable vape devices!

Be sure to share your vaping story and tag us on social media with the tags #fumot_official, #fumotvape,  #supblissvape, or #vomevape.

Follow us on FacebookInstagramYouTube, and X.

For vapers who crave variety without the hassle of carrying multiple devices, the ECO 2in1 50K is a game-changer. This innovative pod system combines two core desires: dual-flavor flexibility and practical, user-friendly design. With its 10+10ml visible dual oil cups (so you never guess how much e-liquid is left), 0.9Ω mesh coil (for smooth, even flavor), real-time LED battery display (no more “dead device surprises”), and eye-catching RGB breathing lights, it’s built for both function and fun.
Whether you’re a beginner new to dual-tank vapes or a seasoned user chasing flavor combinations, this guide walks you through every step of using the ECO 2in1 50K—from unboxing to flavor switching—plus pro tips to maximize your experience.

Step 1: Remove the device from the candy bag

First, open the Fumot ECO 2in1 50K’s packaging (designed for easy access and device protection). Inside, you’ll find:
  • 1 x Fumot ECO 2in1 50K pod system (main device body + pre-attached mouthpiece)
  • No extra tools or chargers—though the device includes a Type-C port for recharging (use a standard Type-C cable, sold separately).
Before proceeding, do a quick visual check: Ensure the dual oil cups (transparent, on the front of the device) are intact (no cracks), the mouthpiece is securely attached, and the LED screen (on the device body) is free of scratches.
step-1-how-to-use-eco-2in1-50k

Step 2: Pull out the two sealing pins from the device and put the drip tip back on

The ECO 2in1 50K’s biggest selling point is its 10+10ml dual tanks, which let you enjoy two different flavors at once.
step-2-how-to-use-eco-2in1-50k

Step 3: Remove the silicone plug and the bottom insulating sticker from the device

step-3-how-to-use-eco-2in1-50k

How to use dual-flavor switching? (The ECO 2in1 50K’s Best Feature)

The magic of the ECO 2in1 50K is its ability to switch between two flavors in seconds—no need to swap pods or clean tanks. Here’s how to do it:
  1. Gently lift and rotate the mouthpiece to align with the tank you want to use.
With 19 pre-curated flavor combinations (from Fumot’s official specs), the possibilities are endless. Fan favorites include:
  • Banana Ice & Black Dragon Ice (cool, fruity contrast)
  • Cool Mint & Watermelon Ice (classic refreshment)
  • Grape Gummy Bear & Strawberry Gummy Bear (sweet, candy-like blend)
  • View all 19 combos on the Fumot ECO 2in1 50K product page.


Critical Safety & Maintenance Tips (From Fumot’s Guidelines)

To keep your ECO 2in1 50K working well and stay safe, follow these rules:
  1. Store correctly: Keep the device at 10–25°C (50–77°F) and out of direct sunlight. Extreme heat (e.g., a car dashboard in summer) can warp the oil tanks, while cold temperatures (freezing) can thicken e-liquid and block the coil.
  2. Keep away from children/pets: The ECO 2in1 50K contains nicotine (a highly addictive substance). Store it in a high, locked cabinet—if e-liquid touches skin, rinse with cold water for 10 minutes; if ingested, contact a doctor immediately.
  3. Do not disassemble: The ECO 2in1 50K’s dual tanks and coil are not replaceable. If the coil burns out (signaled by a burnt taste) or tanks crack, replace the entire device.

Get the Most Out of Your ECO 2in1 50K

The Fumot ECO 2in1 50K is all about making dual-flavor vaping easy, fun, and reliable. By following these steps—filling the dual tanks correctly, switching flavors smoothly, and caring for the device—you’ll enjoy rich, layered taste (thanks to the mesh coil), peace of mind (from the battery display), and a little joy (from the RGB lights) with every draw.
Ready to try your own flavor combo? Head to the Fumot ECO 2in1 50K official page to browse 19 pre-paired options or mix your own. And if you’ve found a favorite flavor combo, share it in the comments below—we’d love to hear how you’re using your ECO 2in1 50K!
Happy vaping—responsibly!


About Fumot Tech

Shenzhen Fumot Technology Co., Ltd specializes in the production, research, and sales of disposable vape devices and customized electronic cigarette hardware. Over the past decade, Fumot has introduced several vape brands, including FumotSupbliss, and Vome, earning the admiration of a vast consumer base.

We pride ourselves on pioneering hardware designs and infusing the most delectable flavors into our devices. With our formidable research and development, manufacturing, and marketing capabilities, our products have reached major markets, including North America, Southeast Asia, the UK, Europe, and Russia. Our mission is to provide customers with the finest disposable vape devices!

Be sure to share your vaping story and tag us on social media with the tags #fumot_official, #fumotvape,  #supblissvape, or #vomevape.

Follow us on FacebookInstagramYouTube, and X.

Fumot-Vape-Airflow-Control
For vapers, airflow control is the unsung hero of a great vaping experience. It dictates everything from the intensity of flavor on each draw to the density of vapor produced, and even the harshness of the throat hit. A too-restricted airflow can lead to a tight, harsh draw (similar to a traditional cigarette), while an overly loose airflow might dilute flavor and reduce satisfaction.
Fumot Vape, a leader in pod systems and disposable vapes, has tailored its airflow control features to suit every type of user—from beginners seeking hassle-free consistency to enthusiasts chasing customizable cloud and flavor profiles. This guide breaks down Fumot’s airflow technologies, highlights key models with standout airflow features, and teaches you how to optimize settings for your unique preferences.

What Is Airflow Control in Vaping? (Quick Primer)

Airflow control refers to the system that regulates the amount of air that mixes with vapor as you draw on a vape device. In pod systems and e-cigarettes, this is typically managed through pre-set (fixed) vents or manual adjustment mechanisms (knobs, switches, or sliders).
The benefits of intentional airflow control are undeniable:
  • Customize throat hit: Tighter airflow creates a stronger throat hit (ideal for mouth-to-lung, or MTL, vapers who prefer a cigarette-like draw), while looser airflow delivers a milder hit for direct-to-lung (DTL) cloud chasers.
  • Balance flavor and vapor: Restricted airflow concentrates flavor by forcing vapor to pass over taste buds more slowly, while increased airflow allows for larger vapor production at the cost of some flavor intensity.
  • Prevent device issues: Proper airflow prevents overheating of coils and dry hits (burnt, unpleasant draws caused by insufficient e-liquid saturation in the coil).

Types of Airflow Control in Fumot Vape Devices

Fumot offers two core airflow control types across its lineup, each designed for specific user needs:

1. Fixed Airflow (For Casual Users & Compliance-Focused Models)

Fixed airflow systems feature pre-set, non-adjustable air vents that deliver a consistent draw every time. There’s no need for manual tweaking, making them perfect for beginners or users who prioritize convenience over customization. Fumot uses this design for devices targeted at casual vapers or those in regulated markets where simplicity and compliance are key.

2. Manual Adjustable Airflow (For Enthusiasts & Flavor Chasers)

For vapers who want to fine-tune their experience, Fumot incorporates manual adjustable airflow in its premium and enthusiast-focused models. This category includes two primary mechanisms:
  • Multi-level sliding vents: A slider with pre-set settings (e.g., 3 levels) for quick switching between tight, medium, and loose draws.

Fumot Vape Models with Standout Airflow Control

Fumot’s airflow features are tailored to each device’s core purpose, from EU-compliant models to shisha-style cloud machines. Here’s a breakdown of key devices and their airflow systems:

1. Fumot Matelix Pro: Triple Adjustable Airflow

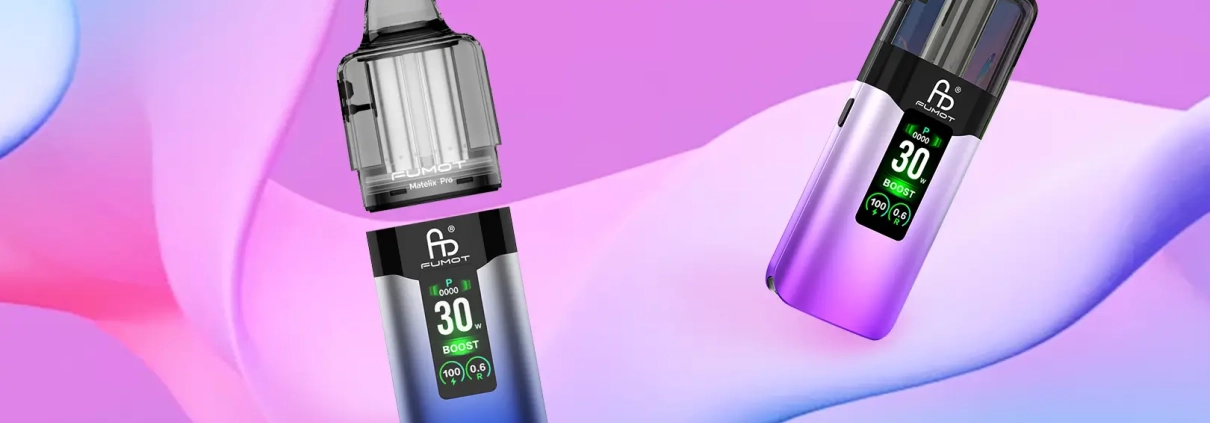
The Fumot Matelix Pro is a top pick for vapers who want versatility, thanks to its triple adjustable airflow system. This pod system offers three distinct airflow levels that let users switch seamlessly between MTL and DTL draws:
  • The tightest setting narrows air vents to create a concentrated, cigarette-like MTL draw that amplifies flavor for high-PG e-liquids.
  • The medium setting balances vapor and flavor, making it ideal for daily casual use with balanced PG/VG blends.
  • The loosest setting opens vents fully to maximize airflow, producing dense clouds for DTL vaping with high-VG e-liquids.
Paired with its 0.96-inch smart screen and dual mesh coils, the Matelix Pro’s airflow control turns it into a all-in-one device for both flavor purists and cloud enthusiasts.

2. Fumot Shisha Pod: Top Airflow Knob (Shisha-Style Clouds)

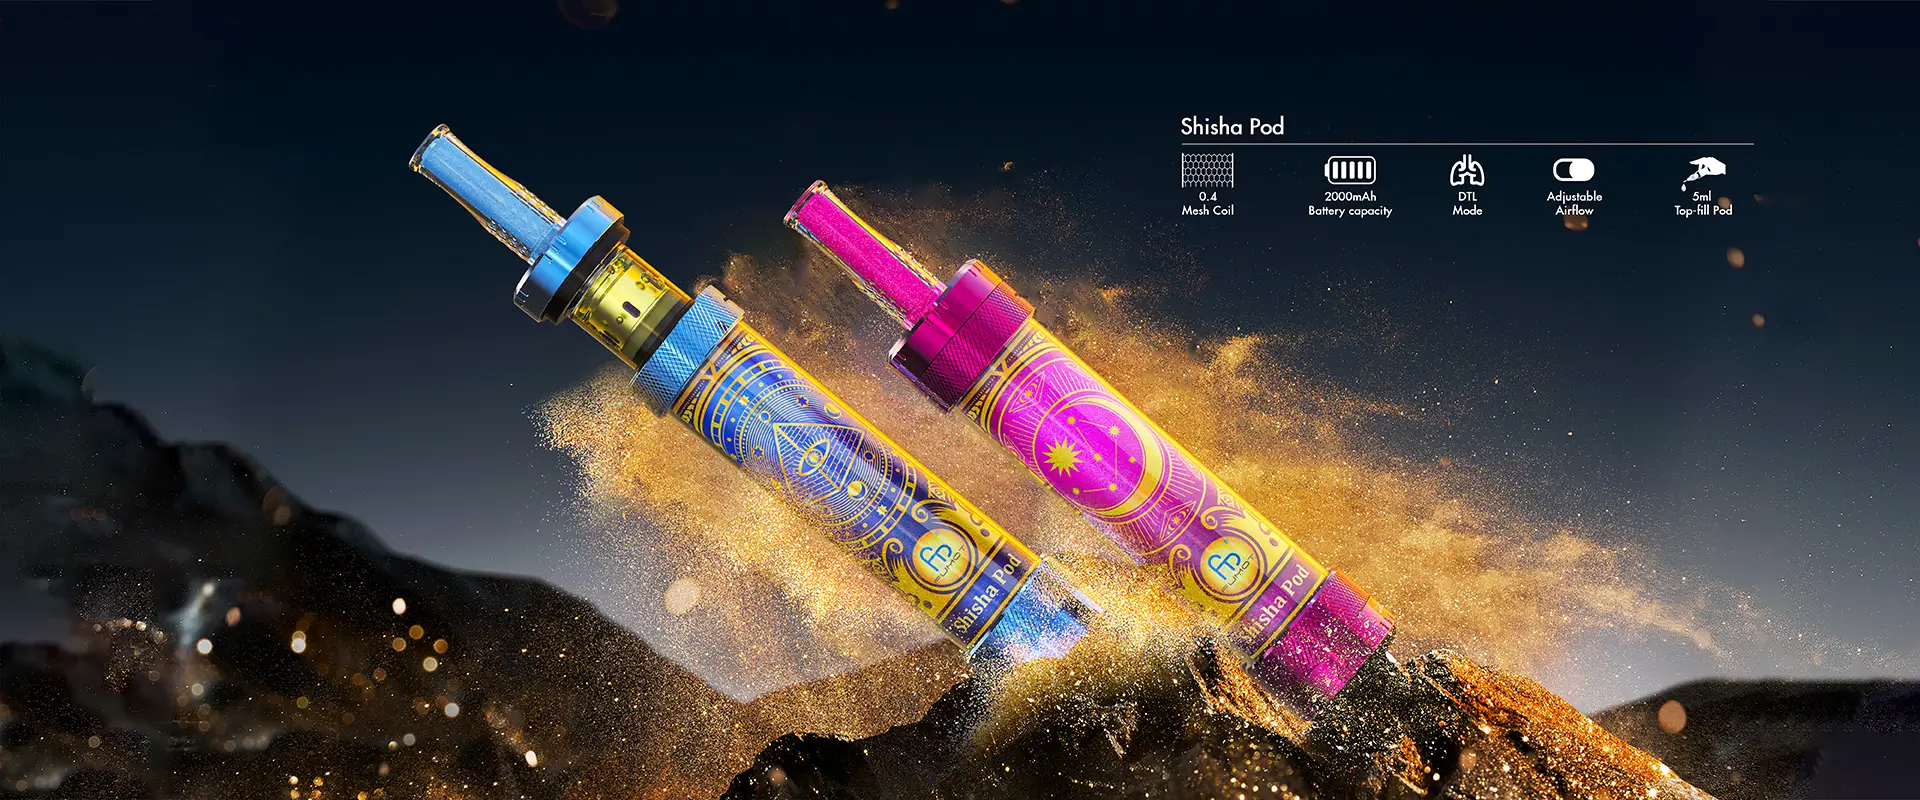
The Fumot Shisha Pod is built to replicate the thick, smooth clouds of traditional hookahs, and its top-mounted airflow knob is key to this experience. The knob offers two dedicated modes:
  • A restricted mode for a milder, flavor-forward draw (ideal for fruit or mint e-liquids that mimic shisha flavors).
  • A fully open mode that maximizes airflow, enabling the device’s 0.4Ω mesh coil to produce massive, dense clouds true to a traditional shisha session.
This airflow design is paired with RGB lighting and Arabian-inspired aesthetics to complete the authentic hookah vibe in a portable pod system.

3. Fumot T7000 Pod: Bottom Airflow Knob (EU TPD-Compliant)

For EU-based vapers who need compliance without sacrificing customization, the Fumot T7000 Pod features a bottom-mounted airflow knob that works within TPD regulations. The device’s 2+10ml modular design meets EU pod capacity limits, while its airflow knob lets users adjust draws to their preference:
  • Tighter airflow for a satisfying MTL hit with 2% nicotine salt e-liquids (the maximum allowed in the EU).
  • Moderate airflow for balanced vapor production that complies with regional restrictions on cloud size.
This makes the T7000 Pod a go-to for EU vapers who want regulatory compliance and personalization in one device.

4. Fixed Airflow Models: Fumot 12000 & Volcano 600

Not all Fumot devices prioritize adjustability. The Fumot 12000 (a compact, entry-level disposable vape) and Fumot Volcano 600 (a TPD-compliant disposable) feature fixed airflow, designed for hassle-free use:
  • The Fumot Vape 12000’s fixed airflow delivers a smooth, cool MTL draw that pairs with its 550mAh battery and 0.8Ω mesh coil, perfect for on-the-go casual vapers who don’t want to tweak settings.
  • The Volcano 600’s fixed airflow is calibrated to match its 2ml TPD-compliant pod and ceramic coil, ensuring consistent flavor and vapor until the device’s 400mAh battery is depleted—no adjustments required.

How to Adjust Airflow on Fumot Devices (Step-by-Step)

Adjusting airflow on Fumot’s manual models is straightforward, but small tweaks can make a big difference in your experience:

For Knob-Controlled Devices (Shisha Pod, T7000 Pod)

  1. Locate the airflow knob (top of the Shisha Pod, bottom of the T7000 Pod).
  2. Rotate the knob clockwise to restrict airflow (tighter draw, more flavor) or counterclockwise to open airflow (looser draw, more vapor).
  3. Test a draw after each adjustment to find your preferred setting—avoid fully closing vents, as this can cause overheating and dry hits.

For Triple-Adjustable Systems (Matelix Pro)

  1. Find the airflow slider on the side of the device (marked with 3 levels).
  2. Slide to the first (tightest) level for MTL draws with high-PG e-liquids (e.g., menthol or tobacco flavors).
  3. Slide to the second (medium) level for daily use with balanced e-liquids (50/50 PG/VG).
  4. Slide to the third (loosest) level for DTL cloud production with high-VG e-liquids (e.g., dessert or fruit blends).

Common Mistakes to Avoid

  • Over-tightening vents: This restricts air flow to the coil, causing it to overheat and burn e-liquid (resulting in dry hits).
  • Blocking vents with fingers: Accidentally covering air vents while vaping can disrupt airflow and damage the coil over time.
  • Ignoring e-liquid type: High-VG e-liquids need loose airflow to vaporize properly, while high-PG blends perform best with tighter airflow.

Pro Tips for Optimizing Airflow with Fumot Vapes

To get the most out of your Fumot device’s airflow system, follow these expert tips:
  1. Match airflow to e-liquid: Use tight airflow for high-PG (≤50% VG) e-liquids (to enhance throat hit and flavor) and loose airflow for high-VG (≥70% VG) e-liquids (to maximize vapor production).
  2. Extend coil life: Avoid overly restricted airflow during chain vaping—adequate air flow keeps coils cool and prevents premature burnout.
  3. Troubleshoot clogs: If airflow feels blocked, gently clean air vents with a cotton swab (do not use water, as Fumot devices are not waterproof). For stubborn clogs, replace the cartridge or pod.
  4. Adjust for nicotine strength: Higher nicotine e-liquids (e.g., 20mg/ml) pair well with tighter airflow to reduce harshness, while lower nicotine levels (e.g., 0mg/ml) work with looser airflow for cloud chasing.

FAQs About Fumot Vape Airflow Control

Q1: Can I modify airflow on fixed-airflow Fumot devices?

No. Fumot’s fixed-airflow models (like the Fumot 12000 and Volcano 600) have sealed vents that cannot be modified. Tampering with these vents can damage the device and void any warranties.

Q2: How does airflow affect battery life?

Looser airflow requires less battery power to heat the coil (since air cools the coil more efficiently), while tighter airflow forces the battery to work harder to maintain coil temperature, reducing battery life slightly.

Q3: Which airflow setting is best for beginners?

Beginners should start with a medium or tight airflow setting (MTL draw), as it mimics the feel of traditional cigarettes and reduces the risk of coughing or discomfort from large vapor clouds.

Q4: Do EU-compliant Fumot models have limited airflow options?

EU-compliant models like the T7000 Pod and Mate Pod offer adjustable airflow, but the range is calibrated to meet regional regulations (e.g., limiting cloud size). This ensures compliance without eliminating customization.

Find Your Perfect Airflow Setting

Fumot’s airflow control systems cater to every type of vaper—whether you’re a beginner seeking simplicity, an enthusiast chasing clouds, or an EU user needing compliant customization. From the triple-adjustable Matelix Pro to the shisha-optimized Shisha Pod and fixed-airflow Fumot 12000, there’s a Fumot device with airflow features that match your needs.
The key to great vaping is balancing airflow with e-liquid type and personal preference. Start with medium settings, experiment with small tweaks, and don’t hesitate to reach out to Fumot’s customer service (wholesale@szfumot.com) if you need help refining your setup.
Have you found your ideal Fumot airflow setting? Share your tips in the comments below, or head to Fumot’s official website to explore more airflow-enabled devices.
how-to-use-tornado-box-pod
The Fumot Tornado Box Pod is designed for straightforward use, but following the official steps ensures optimal performance and safety. This tutorial pulls directly from the Tornado Box Pod’s user manual to walk you through every key operation—no guesswork, just reliable guidance.

Step 1: Remove the Device from the Pouch

tornado-box-pod-guide-1
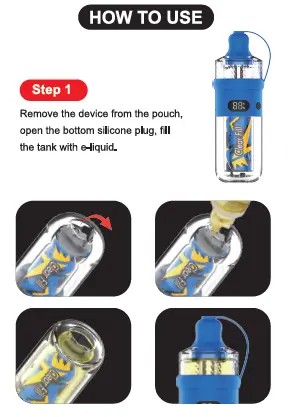
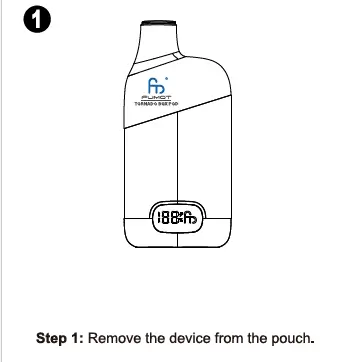
Begin by taking the Tornado Box Pod out of its original packaging pouch. This is the first step to unbox and prepare your device for setup, as outlined in the official manual.

Step 2: Separate the Cartridge from the Device

tornado-box-pod-guide-2
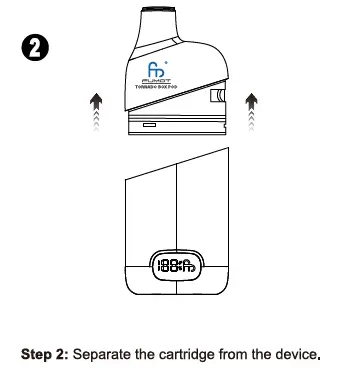
Next, split the two main components of the Tornado Box Pod:

Gently hold the device body with one hand and the cartridge with the other, then pull them apart to separate. This step is essential to access the cartridge for e-liquid filling.

Step 3: Fill the Cartridge with E-Liquid

tornado-box-pod-guide-3
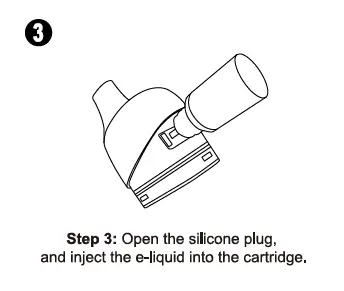
To add e-liquid to the cartridge, follow these manual-guided steps:
  1. Locate the silicone plug on the cartridge.
  2. Carefully open the silicone plug—do not remove it entirely to avoid misplacing it.
  3. Slowly inject your chosen e-liquid into the cartridge through the opening.
  4. After filling, reclose the silicone plug securely to prevent leaks.

Step 4: Remove the Insulating Sticker from the Cartridge

tornado-box-pod-guide-4
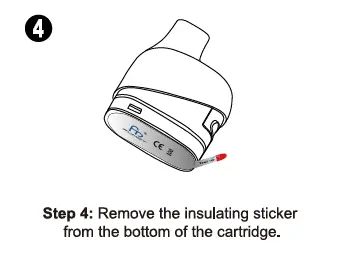
This critical step ensures the cartridge connects properly to the device:

Flip the filled cartridge to its bottom side, find the insulating sticker covering the metal contacts, and peel it off completely. Leaving the sticker on will block the battery connection, making the device inoperable.

Step 5: Reinstall the Cartridge and Wait

tornado-box-pod-guide-5
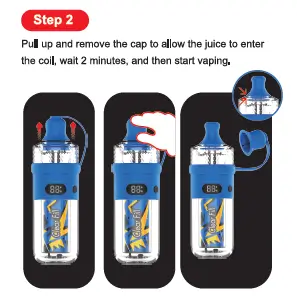
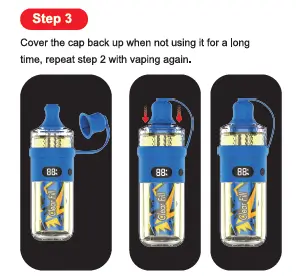
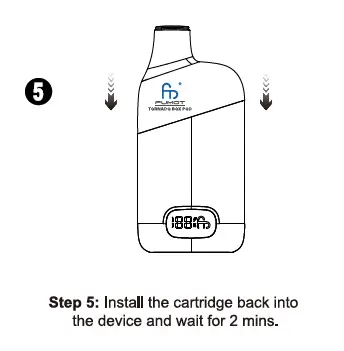
To finalize setup and avoid burnt tastes, do the following:
  1. Align the cartridge with the device body, ensuring the metal contacts match up.
  2. Push the cartridge back into the device until it fits securely.
  3. Wait for 2 full minutes—this allows the e-liquid to fully soak into the cartridges coil, a key step to ensure smooth flavor and protect the coil.

Important Tips from the Official Manual

For safe and effective use, keep these manual-recommended tips in mind:
  • Do not use if damaged: Before each use, check the device and cartridge for cracks or leaks—stop using if any damage is found 1.
  • Store properly: Keep the Tornado Box Pod at 10–25°C, away from direct sunlight and temperatures above 30°C. Never refrigerate or freeze the device.
  • Keep away from children: The product contains nicotine (highly addictive and toxic if ingested by kids), so store it out of children’s reach.

Need More Help?

If you have questions or issues, contact Fumot’s customer service via email (wholesale@szfumot.com) or visit the official website (www.szfumotvape.com) for further assistance.
Enjoy your Tornado Box Pod responsibly—always follow the official manual for safe usage!

About Fumot

Shenzhen Fumot Technology Co., Ltd specializes in the production, research, and sales of disposable vape devices and customized electronic cigarette hardware. Over the past decade, Fumot has introduced several vape brands, including FumotSupbliss, and Vome, earning the admiration of a vast consumer base.

We pride ourselves on pioneering hardware designs and infusing the most delectable flavors into our devices. With our formidable research and development, manufacturing, and marketing capabilities, our products have reached major markets, including North America, Southeast Asia, the UK, Europe, and Russia. Our mission is to provide customers with the finest disposable vape devices!

Be sure to share your vaping story and tag us on social media with the tags #fumot_official, #fumotvape,  #supblissvape, or #vomevape.

Follow us on FacebookInstagramYouTube, and X.

fumot-vape-heating-cores
Fumot Vape’s heating core technology directly shapes its vaping experience, with three core types tailored to diverse user needs. Below is a clear breakdown of each type, their key differences, and matching Fumot products.

1. Mesh Coil (Single Mesh Heating Core)

Core Traits

The most widely used heating core in Fumot’s lineup, featuring a metal mesh structure that creates a large heating surface. It balances vapor production and flavor retention, with fast heating speed and stable performance—ideal for casual vapers seeking consistency without complexity.

Matching Fumot Products

  • Fumot Vibe X: Paired with mesh coil to deliver bold flavor via 35W output, complemented by an HD screen for real-time stats.
  • Fumot Aqua Flow: Mesh coil ensures smooth, cool vapor, matching its compact design for on-the-go use.
  • Fumot Tornado Series (7000/9000/12000): Disposables like Tornado 7000 and Digital Box 12000 use mesh coils to generate huge vapor and optimal taste, with puff counts up to 12,000.
  • EU TPD Models: Fumot T9000 Pro Max and T7000 Pod adopt mesh coils to meet regional regulations while maintaining satisfying flavor.

2. Dual Mesh Coils (Dual-Layer Mesh Heating Core)

Core Traits

An upgraded version of the single mesh coil, with two overlapping mesh layers that double the heating area. This enhances vaporization efficiency, producing denser clouds and richer flavor layers—perfect for enthusiasts craving intense hits.

Matching Fumot Products

  • Fumot Matelix Pro: Dual mesh coils pair with triple adjustable airflow, letting users switch between tight MTL and loose DTL draws.
  • Fumot Click Pod: 0.6Ω dual mesh coils enable spill-proof refilling and strong flavor, supported by a magnetic pod design for easy swaps.
  • Fumot Mate Pod: Dual mesh coils work with ECO/Boost modes, customizing vapor strength for EU users seeking compliant performance.

3. Ceramic Coil (Porous Ceramic Heating Core)

Core Traits

A premium option with a porous ceramic base that heats evenly and resists overheating. It delivers smooth, refined vapor with pure flavor (no burnt taste) and higher durability—suited for users prioritizing subtle taste and long-term reliability.

Matching Fumot Products

  • Fumot Volcano 600: TPD-compliant disposable with ceramic coil, boosting vaporization efficiency by 30% and offering 16 flavors for EU markets.

Key Differences Between Fumot’s Heating Cores

FeatureMesh CoilDual Mesh CoilsCeramic Coil
Vapor OutputModerateDense, largeSmooth, fine
Flavor PerformanceBalanced, consistentRich, layeredPure, subtle
DurabilityModerateHighHighest
Best ForCasual daily useEnthusiasts, cloud chasersFlavor purists, EU users

Final Selection Guide

  • Casual Vapers: Choose mesh coil models like Fumot Aqua Flow for hassle-free daily use.
  • Flavor/Cloud Enthusiasts: Opt for dual mesh coil devices such as Fumot Matelix Pro.
  • EU Users/Premium Seekers: Ceramic coil options like Fumot Volcano 600 deliver compliant, refined vaping.

About Fumot Tech

Shenzhen Fumot Technology Co., Ltd specializes in the production, research, and sales of disposable vape devices and customized electronic cigarette hardware. Over the past decade, Fumot has introduced several vape brands, including FumotSupbliss, and Vome, earning the admiration of a vast consumer base.

We pride ourselves on pioneering hardware designs and infusing the most delectable flavors into our devices. With our formidable research and development, manufacturing, and marketing capabilities, our products have reached major markets, including North America, Southeast Asia, the UK, Europe, and Russia. Our mission is to provide customers with the finest disposable vape devices!

Be sure to share your vaping story and tag us on social media with the tags #fumot_official, #fumotvape,  #supblissvape, or #vomevape.

Follow us on FacebookInstagramYouTube, and X.